Sending Faxes Using the Exchange Connector
Exchange Connector allows you to send and receive fax messages as easily as email messages, right from your Outlook Inbox. Documents may also be sent as fax messages directly from most third-party applications. Exchange Connector’s address book and contact list integration, and the FaxPress Address template further simplify your fax messaging.
Sending a fax requires that your message be addressed to the recipient’s fax number. You may address a fax message by selecting a fax-specific address book entry, or by entering the recipient’s fax number according to the Exchange Connector’s manual addressing format (see Manual Addressing). After addressing your message, and writing whatever note you’d like to appear on the cover page/email message, attach the file you’d like to fax, then send your message. Attachments are rendered into fax file format for most applications, allowing you to send an attached file to both fax and email recipients simultaneously.
Using FaxPress Forms to Send Faxes
FaxPress fax forms for Exchange offers custom fax interfaces integrated into your existing Outlook client. The FaxPress forms for Exchange are available after the forms are published. The forms publishing procedure is described in Publishing the FaxPress Forms.
Using the FaxPress forms for sending faxes is optional. To specify a variety of fax job parameters, the fax form is ideal. To send a simple fax with only the standard recipient name and fax number info, use Outlook’s New Mail Message with the Exchange Connector’s manual addressing format. See Manual Addressing.
To send a fax message using the FaxPress forms for Exchange, follow these steps:
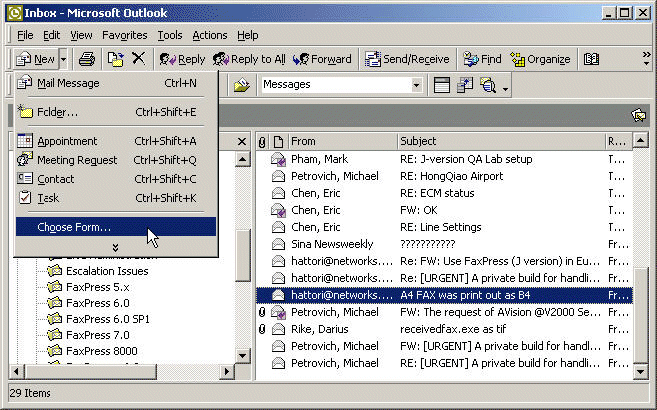
| 1. | In Outlook, select Forms from the Tools menu, and then click Choose Form. |
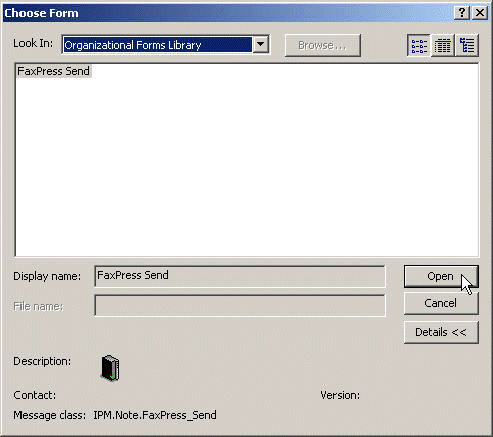
| 2. | In the Organizational Forms Library, select FaxPress Send and click Open. |
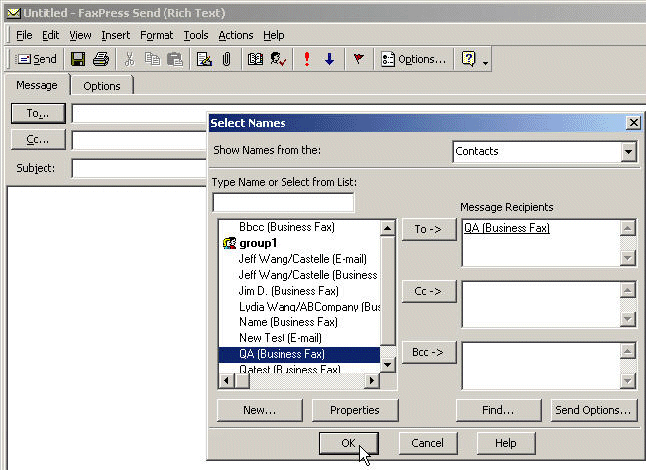
| 3. | Select the To: button to bring up the Select Names window. From your Contacts address book selected, choose an entry containing (Business Fax) information, click To-> to add the entry to your Message Recipients, then click OK. |
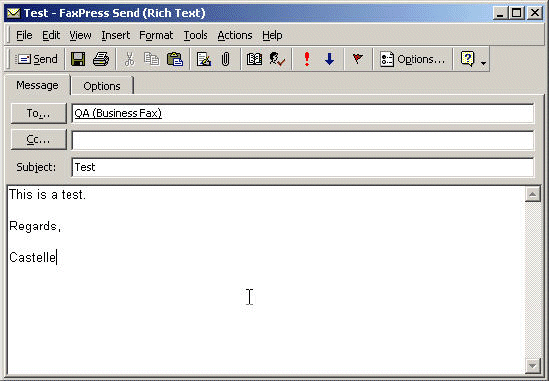
| 4. | Enter Subject information and a message. This information will appear on the fax cover page. Any files you decide to attach will become the body of the fax. |
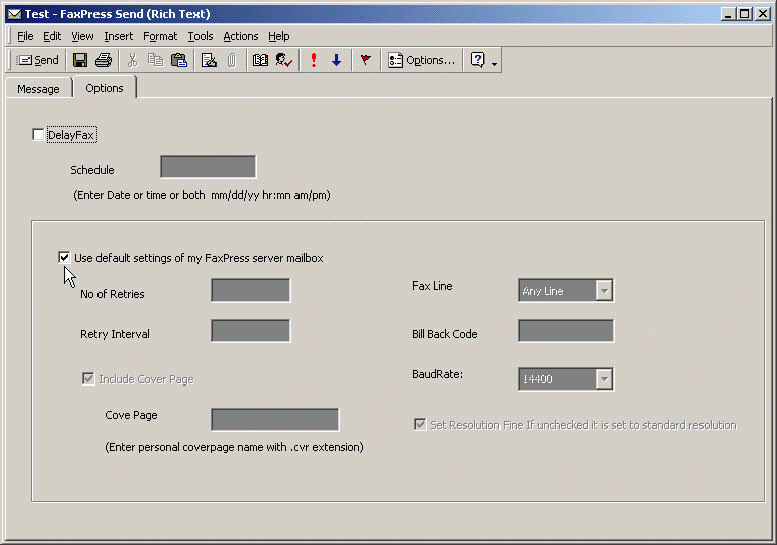
| 5. | Click the Options tab to specify additional fax transmission parameters. The FaxPress server settings are used by default, but these may be customized by unchecking Use default settings of my FaxPress server mailbox. |
Using Address Books to Send Faxes
The Contacts list and Personal Address Book are the address books most suited for use with Exchange Connector.
Contacts
Use the Contacts list to send fax messages to recipients outside your LAN. You may already have an extensive Contacts list. If so, once you’ve added business fax numbers to those entries, you can use them to address your faxes.
To use the Contacts list to send a fax message:
| 1. | From your Outlook or Exchange Inbox, select New Mail Message from the upper left hand corner. |
| 2. | From the Untitled-Message window, click on the To:. button to bring up your address books. |
| 3. | From the Select Names window, choose Contacts from the pull-down menu in the upper right corner. |
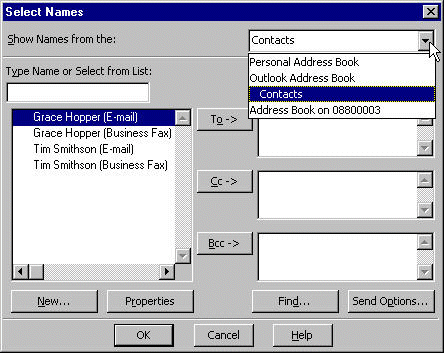
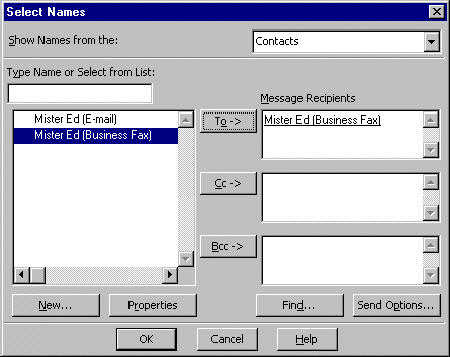
| 4. | Select the your recipient’s Business Fax entry, click To -> then OK. Your message will now be addressed. |
Adding New Entries
Contacts allows you to import information (existing customer lists, other address books, etc.) from external data sources. Refer to Microsoft Outlook Help for importing details.
To add new individual entries:
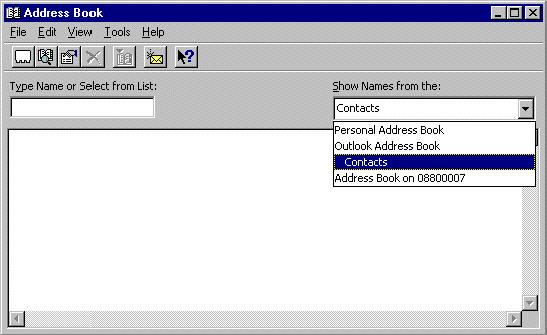
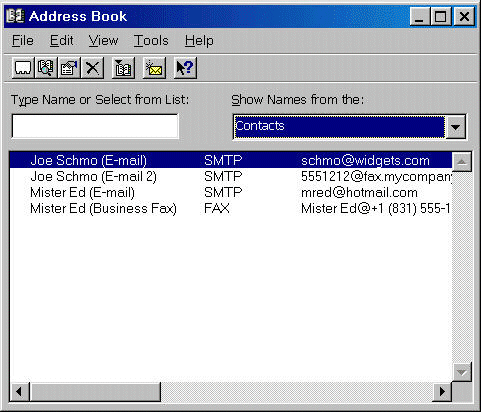
| 1. | Select Tools>Address Book, then select Contacts in the Show Names from the: pull-down menu. |
| 2. | Select the New Entry icon, or select New Entry from the File menu. |
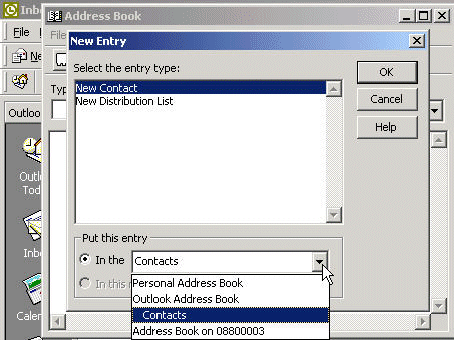
| 3. | In the New Entry window, select New Contact from the Put this entry in the: pull-down menu. Click OK. |
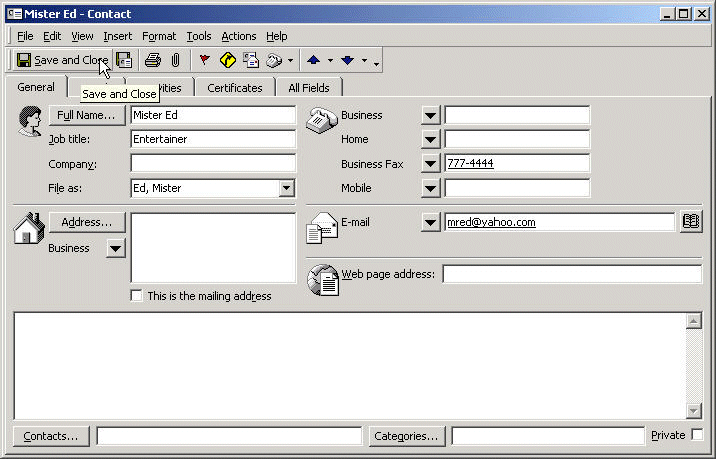
| 4. | Enter your contact’s information, then click Save and Close. |
Including the Recipient’s Company Name
Information in the Company Name field of the Outlook Contact list is not automatically passed to the FaxPress. To enable the recipient’s Company name to be passed to the FaxPress, use either of the following two options:
Option 1 allows you to address your fax using the Business Fax entry from your Contacts list.
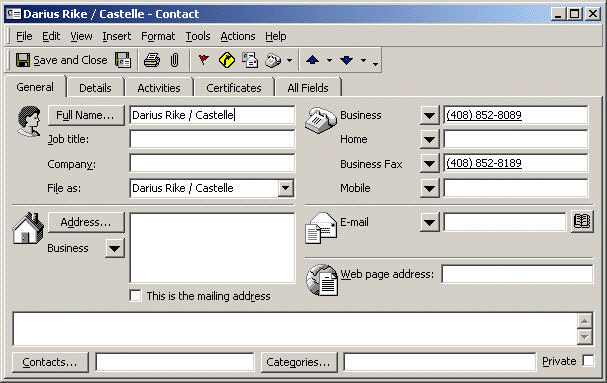
To enable this option, enter the contact name followed by a forward slash followed by the company name in the Full Name field of the Outlook Contact, e.g.:
Oscar Wilde/Castelle
Next, enter the contact’s fax number in the Business Fax field.
Option 2: allows you to use the E-mail rather than Business Fax entry to address your fax. To enable this option, leave the Business Fax field blank, enter the recipient’s fax number in the Contact E-mail field according to the following format:
[fax:Name/Company@Fax Number]
Example:
[fax:Darius Rike/Castelle@4088528189].
Next, double-click on the email address you entered to display the E-mail Properties window. The information you entered according to the above format will appear as shown in the following Figure.
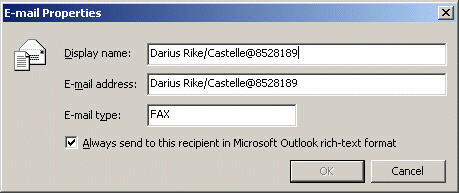
To address a new mail message using the information entered in Option 2, select the “E-mail” entry from the contact list, e.g.: Darius Rike (E-mail).
If the contact has an existing email address in addition to the one created for this purpose, then the entry could appear as: Darius Rike (E-mail 2)
In both Option 1 and Option 2, the Company Name will appear on the fax cover page’s Recipient Company Name field and in the Outgoing Fax Queue under the Company column.
The FaxPress Address Template and the Personal Address Book also allow additional sending options, including the Company name. See Personal Address Book and Using Manual Addressing Formats for more information.
The Personal Address Book, in utilizing FaxPress Address Template entries, offers you fax sending features not available with the Contacts list and Global Address List.
The FaxPress Address template’s fax sending features enable control over the:
| ■ | date and time the fax is to be sent |
| ■ | Cover Page selection |
| ■ | Number of Retries and Retry Interval |
| ■ | Billback code |
The Personal Address Book requires you to enter fax and email address entries separately. Add all fax entries using the Faxpress Address Template to enable the sending options described above.
Addressing a Fax by Creating a New Entry
To send a fax message by creating a new Personal Address Book entry, follow these steps:
| 1. | Open your Outlook Inbox and select New Mail Message from the upper left hand corner. |
| 2. | From the Untitled-Message window, click on the To... button to bring up the Select Names window. |
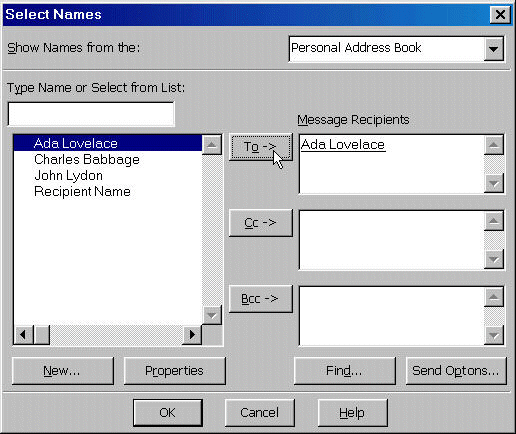
| 3. | From the upper right corner of the Select Names window, choose Personal Address Book from the pull-down menu. |
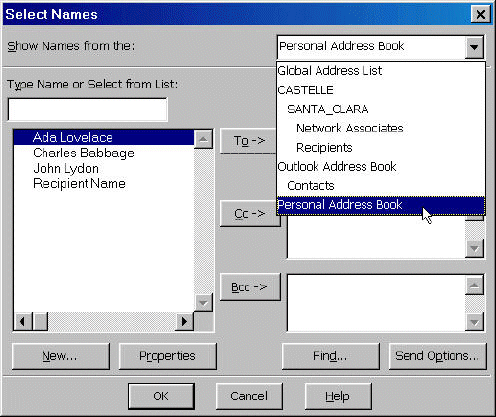
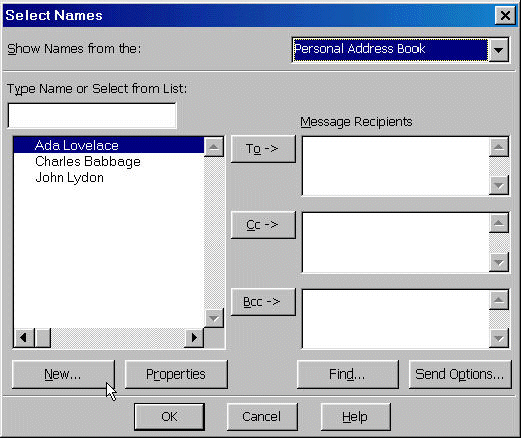
| 4. | In the Select Names window, with Personal Address Book selected, click the New... button. |
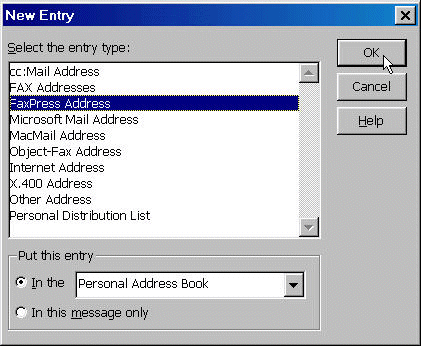
| 5. | In the New Entry window, select FaxPress Address from the Select the entry type list, and Personal Address Book from the Put this entry/In the pull-down menu, then click OK. |
| 6. | The FaxPress Address Properties dialog box allows you to configure your fax message’s transmission parameters. The default parameters are set on the server by the administrator. |
Enter settings entered shown in the Figure below to override those on the server, or leave fields blank to use the server settings.
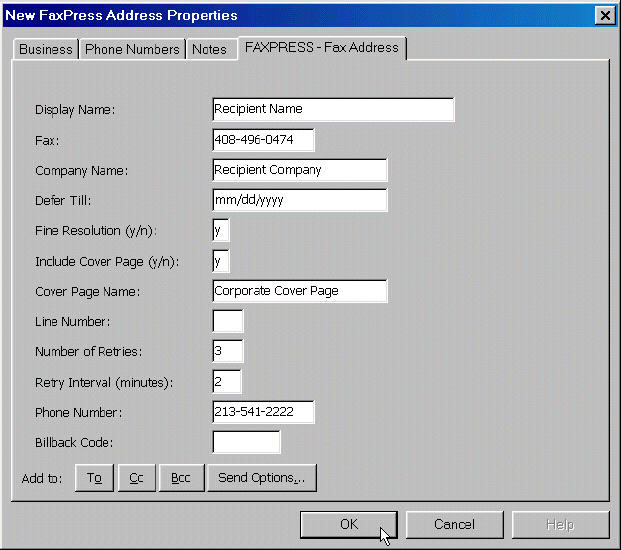
Complete the required* Display Name and Fax fields and any additional optional fields, then click OK.
Display Name*: enter the recipient’s first and last name.
Fax*: enter the recipient’s fax number.
Company Name: enter the recipient’s company name.
Defer Till: Specify a future date and time for transmission. The date format depends on the FaxPress server settings. Check with your administrator to find out if the FaxPress is set to mm/dd/yyyy/ or dd/mm/yyyy. Hours and minutes may be added, too, as /hh:mm. If only hh:mm is specified, the current day is used.
The FaxPress server may be set to 12 or 24 hour time. If the server is set to 12 hour time, then an am or pm must be included after the time entry.
Fine Resolution: enable Fine (200 dpi) or Standard (100 dpi).
Include Cover Page: enter ‘y’ to use one of the cover pages held on the Gateway; enter ‘n’ to use your email message as a cover page.
Cover Page Name: specify the cover page to use. Ask your administrator for a list of available cover pages.
Line Number: use this field to choose a particular fax line.
Number of Retries: specify the number of times you’d like FaxPress to try resending. The default is set on the server.
Retry Interval: specify the number of minutes between retries.
Phone Number: enter your phone number and extension.
Billback code: specify a billback code. Admissible billback codes are set on the server.
Add to: The To, Cc and Bcc buttons may be used for addressing. The Send Options button, however, is a Microsoft option intended only for email entries – do not use for fax entries.
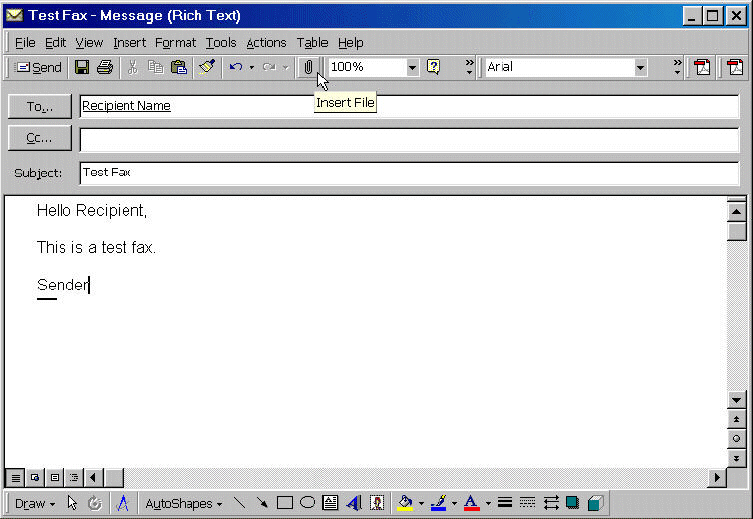
| 7. | Information entered in the Message window will appear on the cover page. Attach a file by clicking the paper clip. |
Existing Entries: Editing, Deleting, Adding to, Using
To edit or remove the entry from your Personal Address Book:
| 1. | From the Outlook Inbox, select Tools>Address Book to bring up the Address Book. Next, select Personal Address Book from the Show Names from the: pull-down menu. |
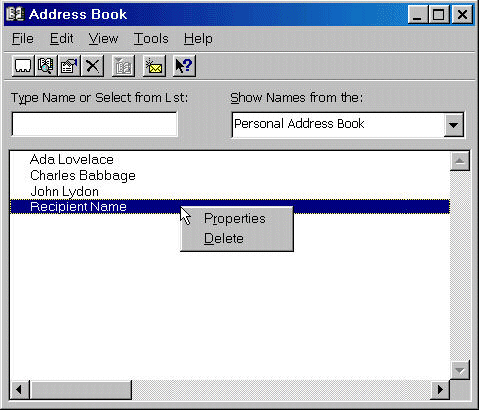
| 2. | Right-click on the entry to bring up the Properties and Delete options. Select Properties to edit; select Delete to remove. |
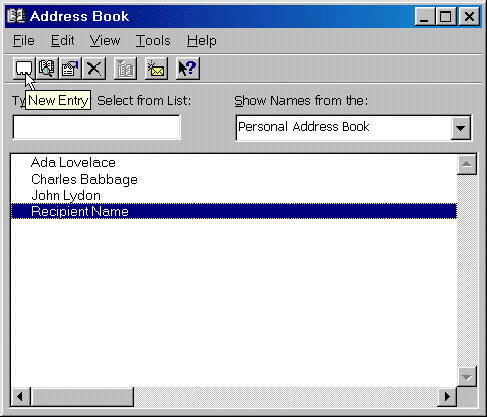
| 3. | Use the New Entry index card icon in the upper left hand corner to add a new Personal Address Book entry. |
| 4. | In the FaxPress Address template that appears, enter the Display Name and Fax number. Click OK. Fill in the rest of the information fields when you use this entry to send a fax. |
To address a fax using an existing entry:
| 1. | Open your Outlook Inbox, select New Mail Message, then click To... to bring up the Select Names window. |
| 2. | In the Select Names window, choose Personal Address Book from the pull-down menu, select a recipient or recipients from the list, select To ->, then click OK. |
Occasionally, you might want to send a fax without adding the recipient to one of your address books. Faxes may be manually addressed one of two ways, by:
| ■ | using the FaxPress Address template |
| ■ | using a manual addressing format. |
Using the FaxPress Address Template
Take the following steps:
| 1. | From your Outlook Inbox, select New Mail Message, then click the To... button in the Untitled-Message window. |
| 2. | In the Select Names window, with Personal Address Book selected, click the New... button. |
| 3. | In the New Entry window, select: |
| ■ | the In this message only radio button. |
| ■ | FaxPress Address from the Select the entry type: list. |
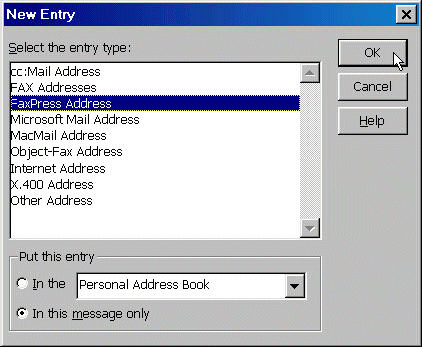
| 4. | Click OK to bring up the FaxPress Address template. Refer to Using the FaxPress Address Template for help entering the template information. |
Using Manual Addressing Formats
You may also address faxes by manually entering the recipient’s fax number according to a variety of manual addressing formats.
Enter the recipient’s information the To: field of an Untitled-Message window according to any of the following formats:
[fax: recipient-name@fax-number]
e.g. [fax:Oscar Wilder@408-852-8024]
or
[FAX:recipient-name/company-name@fax-number]
e.g. [FAX:Oscar/Castelle@408-852-8134]
e.g. [FAX:Oscar Wilder/Castelle Inc@408-852-8134]
The information entered will appear in the corresponding recipient and company name fields of your fax cover page. Use a semicolon as a delimiter to enter multiple recipients.
The key word FAX is not case sensitive.
Additional Fax Job Addressing Options
To provide more fax job options in the address string, certain switches, associated with their values by an = sign, can be used with { } enclosure characters.
Example of how job option switches are associated with their values by an = sign, and enclosed with the { } enclosure characters:
[Fax:Asawari@{cn=castelle}{c=y}{cv=tomdales.cvr}{ph=408-852-8000}1408-852-8024]
Fax job option switches and their associated values are defined as follows:
Target Date:d = mm/dd/yyyy/hh:mm or dd/mm/yyyy/hh:mm
Resolution: r = S - standard or F - fine
Include Cover Page: c = Y - include a cover page or N - do not include a cover page
Recipient Company Name:cn = name of recipient company
Cover Page Name: cv = cover page file name with .cvr extension included (e.g. TomDales.cvr)
Recipient Voice Phone: ph = voice phone number of recipient
Billback Code: b = billback code for the fax
Line Number: l = specify line number to use to send the fax
Retries: rt = number of retries to attempt in trying to send the fax
Retry Interval (minutes): ri = the number of minutes to wait between retry attempts.
Notify on Incoming Fax: in = Y - Send an email to a fax recipient when a fax is received.
Delete fax after Notification:df = Delete the fax on the FaxPress server when the notification is sent.
Exchange Connector will also allow you to send documents as fax messages straight from most third-party applications.
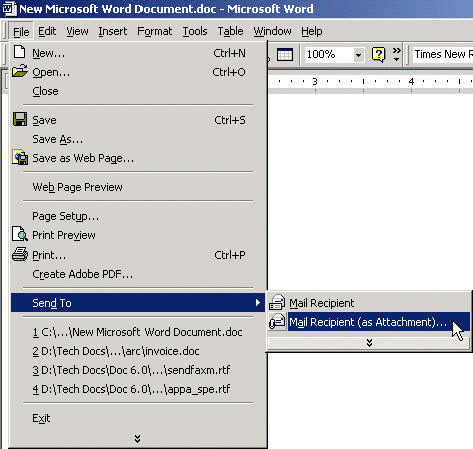
Microsoft Send To
To convert Microsoft documents into fax messages, select File>Send To>Mail Recipient(as Attachment), then address and send as you would a standard email message.
|
FaxPress Premier WebHelp
Last Updated: 11/1/2007
E-mail this page |
Castelle 855 Jarvis Drive, Suite 100 Morgan Hill, CA 95037 Toll-free 800.289.7555 Tel 408.852.8000 Fax 408.852.8100 |